Can You Apply PPF Yourself? The Truth About DIY Kits
Yes, you can technically apply PPF yourself with a pre-cut DIY kit — but for most Calgary drivers it is a costly mistake. Entry-level kits run a few hundred dollars, yet in our experience roughly two-thirds of first-time attempts end in ruined film, trapped dust, or razor cuts in the paint. The biggest risks are permanent "silver eye" dust bubbles, razor cuts in your clear coat, and no warranty. A professional install starts at $399 for partial coverage (most popular full-front at $1,499, full-vehicle from $3,999) and includes a 10-year manufacturer warranty plus our lifetime workmanship guarantee — protection a DIY kit can't match. The honest verdict: DIY PPF saves money on paper and usually loses it in practice.
Yes, you can technically apply PPF yourself with a pre-cut DIY kit — but for most Calgary drivers it is a costly mistake. Entry-level kits run a few hundred dollars, yet roughly two-thirds of first-time attempts end in ruined film, trapped dust, or razor cuts in the paint. The honest verdict: DIY PPF saves money on paper and usually loses it in practice. As professionals who fix DIY disasters on a weekly basis, here is the truth about what really happens when you try to install Paint Protection Film in your own garage — especially in a climate like Calgary's.
The "YouTube Illusion" vs. Reality
Most DIY tutorials are filmed in pristine, climate-controlled studios by installers with thousands of hours of experience. They make stretching a flat sheet of plastic over a curved bumper look effortless. But there is a massive difference between applying a vinyl sticker (which is a dry application) and installing PPF (a wet application).
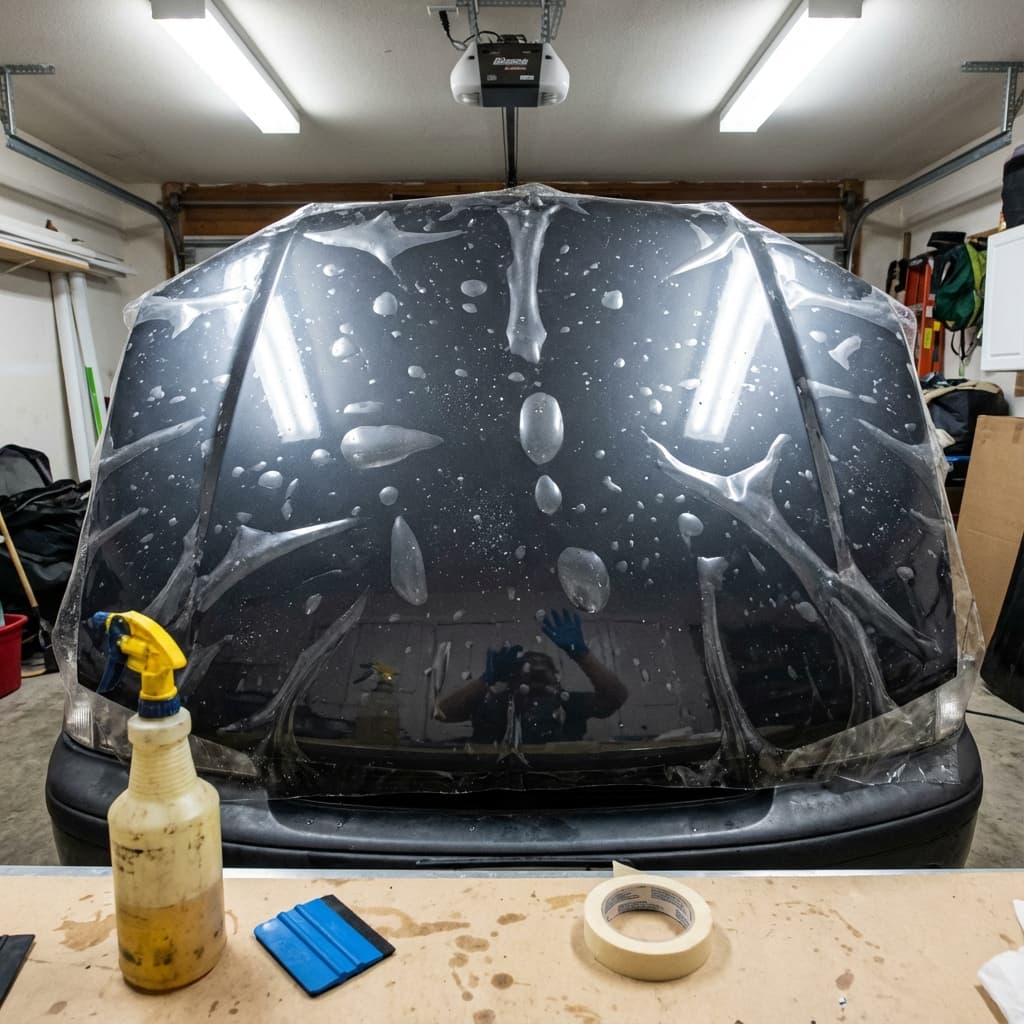
PPF installation is less like applying a sticker and more like floating a contact lens onto an eye—while that eye is moving, and the wind is blowing. You are balancing two different liquids (slip solution and tack solution) while stretching a polyurethane sheet over complex 3D curves, all while trying to avoid trapping a single speck of dust.
The Calgary Factor: Why Location Matters
Calgary presents a unique set of challenges for DIY installers that you won't see in videos from California or Florida.
Dust & Debris
Calgary is dry and dusty. In a standard garage, static electricity pulls dust onto the film the moment you peel the liner. A single speck creates a permanent "silver eye" bubble.
Temperature Swings
PPF needs ~22°C to stretch. If your garage is cold, the film tears. If you use a heater, you risk drying out the slip solution too fast, locking the film in the wrong place.
Complex Geometry
Modern cars (like the Tesla Model Y or new SUVs) have aggressive styling. Stretching film around these compound curves without "lift lines" requires expert technique.
The Risks of DIY Installation
It's not just about the film looking bad; you can actually damage your vehicle or waste significant money. Here is a breakdown of the pros and cons.
The Pros
- Lower upfront cost ($300-$500 for a kit)
- Satisfaction of completing a project (if successful)
- Good learning experience for very small, flat parts
The Cons
- High risk of razor cuts on your paint from trimming
- Permanent "silver eye" bubbles from trapped dust
- Stretch marks and distortion lines in the film
- Fingerprints trapped under the adhesive
- Film peeling or lifting at edges within months
- No warranty coverage for the film or labor
- Wasted material cost if you mess up one panel
Clean Room Standards: What You're Paying For
The biggest difference between a home garage and a professional studio is contamination control. At PPF Pros, our installation bay is a "clean room" environment.
Professional Studio Checklist:
- Air Filtration: Industrial HEPA filters to remove airborne dust.
- Lighting: High-CRI LED lights to spot imperfections from every angle.
- Flooring: Sealed epoxy floors to prevent dust from rising.
- Humidity Control: Misters to weigh down dust particles and reduce static.
Success Rate: What the Data Says
We surveyed customers who came to us for a "redo" after attempting a DIY install. The results were telling. Most people underestimate the difficulty of the "tack vs. slip" balance—knowing when to let the film slide and when to lock it down.
Outcome of First-Time DIY PPF Attempts
From Our Calgary Bay
In our Calgary bay, we've re-done plenty of DIY jobs — and the same handful of failures show up over and over. The most common is the front bumper: someone gets a pre-cut kit on for the flat center, then tries to stretch the film around the corners and ends up with a row of "lift lines" that pop back up within a week. By the time they call us, the film has usually grabbed dust along every exposed edge, so the only fix is a full strip and re-install.
We see a lot of cold-garage damage too. A driver installs in an unheated garage during a Calgary cold snap, the film goes stiff, and it tears the moment they try to wrap a mirror or a door cup. And every winter we get at least one car where a DIY removal pulled clear coat off the bumper because a cheap kit's adhesive had bonded permanently — a repaint that costs far more than the kit ever saved.
The honest pattern: customers rarely save money going DIY. They pay for the kit, fight it for a weekend, then pay us to remove the failed film and install it properly anyway. Doing it once, in our clean room, is almost always the cheaper path.
Comparison: DIY Kit vs. Professional Install
Is the saving worth the risk? Let's look at the numbers and the value proposition directly.
| Feature | DIY Pre-Cut Kit | Professional Installation |
|---|---|---|
| Material Quality | Often thinner, generic film (6mil) | Premium Brand (XPEL/SunTek, 8mil+) |
| Warranty | None (or material only, if lucky) | 10-Year Manufacturer + Labor Warranty |
| Finish Quality | Bubbles, dust, and lift lines common | Invisible, mirror-smooth finish |
| Edge Wrapping | Exposed edges (dirt collects here) | Wrapped edges (seamless look) |
| Risk to Paint | High (razor cuts, adhesive residue) | Zero (insured professional process) |
| Resale Value | Low (looks messy, may need removal) | High (documented protection) |
Our Honest Advice for DIY Enthusiasts
We aren't saying you can't do it. We are saying that for most people, the frustration and cost of failure outweigh the potential savings. However, if you are determined to try, here is our advice:
- Start Small: Do not attempt a bumper or hood as your first project. Start with door cups, the rear luggage strip, or door pillars. These are flat, small, and forgiving.
- Clean Everything: Wash the car, clay bar the surface, and then wash it again. Clean your garage floor. Wear lint-free clothes.
- Watch the Chemistry: Mixing your slip solution (soap and water) is a science. Too much soap, and the film won't stick. Too little, and it sticks instantly, leaving stretch marks.
- Accept Imperfection: Understand that a first-time DIY job will have dust specks and likely some lift lines. If you are a perfectionist, this project will drive you crazy.
Warning: The "Hidden Cost" of Removal
If you install a cheap DIY kit and want to remove it 3 years later, be careful. Low-quality adhesives can bond permanently to your clear coat. We have seen DIY removal attempts that pulled the paint right off the bumper. A professional installation uses film with balanced adhesive designed for safe removal.
Want It Done Right the First Time?
Save yourself the weekend of frustration. Get a professional, warranty-backed installation that increases your vehicle's value.
Get a Free QuoteFrequently Asked Questions
Experience The Best.
Don't let another commute compromise your vehicle. Get a quote from Calgary's Consumer Choice Award winner today.
Explore Our Services


")