What to Expect During Your PPF Installation: A Day-by-Day Guide
PPF installation takes 1–5 days depending on package size. Your car goes through a decontamination wash, optional paint correction, computer-cut film application, edge wrapping, and a final inspection before delivery. After pick-up: no washing for 48 hours, hand wash only for 7 days, no ceramic or wax on PPF for 7–30 days.
"I don't want to be without my car for three days." It's the most common hesitation we hear. Here's a complete walkthrough of the installation process — what we're doing, why each step matters, and exactly what to expect from drop-off to delivery.
Installation Timeline by Package
| Package | Coverage | Typical Duration | Drop-Off / Pickup |
|---|---|---|---|
| Essentials | Bumper + 18" hood strip | 4–6 hours (same day) | Morning drop / afternoon pickup |
| Standard | Full front end | 1–2 days | Day 1 morning / Day 2 afternoon |
| Signature | Full front + A-pillars + roofline | 2–3 days | Day 1 morning / Day 3 afternoon |
| Velocity / Partial Body | Signature + rockers + rear doors | 3–4 days | Confirmed at booking |
| Masterpiece / Full Body | Complete vehicle | 4–5 days | Confirmed at booking |
Timelines include decontamination, application, and final inspection. Paint correction adds 4–8 hours depending on paint condition. Trucks and large SUVs may add half a day. We confirm your specific timeline at booking. Not sure which package is right for you? Our guide on which PPF package is right for your situation walks through every coverage tier.
Before Your Appointment: What to Do
Do This Before Drop-Off
- ✓ Wash the car the day before (or we do a decontamination wash on arrival) — our full guide on how to prepare your car before PPF installation covers everything in detail
- ✓ Remove personal items from the vehicle
- ✓ Arrive with a mostly full tank — the car runs briefly for conditioning
- ✓ Tell us about any existing chips, scratches, or repainted panels so we can flag them
- ✓ Ask us about paint correction if you've noticed swirl marks under certain lighting
Don't Do This Before Drop-Off
- ✗ Apply wax, spray detailer, or any sealant product in the 48 hours before — silicone residue prevents adhesion
- ✗ Use a drive-through car wash — brush washers leave micro-scratches that end up under the film
- ✗ Apply ceramic coating yourself — it'll need to be stripped before PPF goes on
- ✗ Drive through a gravel construction site on the way to us (happens more than you'd think)
The Installation Process: Day by Day
Day 1 — Decontamination & Paint Prep
3–6 hoursYour vehicle arrives and goes through a full decontamination process. This isn't just a car wash — it's a multi-stage process designed to remove every contaminant that would interfere with film adhesion. We start with a foam pre-soak and hand wash, then apply an iron decontamination spray to chemically dissolve embedded brake dust particles from the paint. A clay bar treatment follows, physically removing any bonded contamination the chemical decon missed. After decon, the paint is inspected under high-intensity lighting. If paint correction is recommended and approved, it happens now — this is the window to address swirl marks, light scratches, and water spot etching before film goes on. Our dedicated guide on whether paint correction is needed first explains exactly which paint conditions warrant this step. Prep cannot be rushed. The quality of the installation depends on what's done before the film ever touches the paint.
Day 1–2 — Film Cutting & Pattern Application
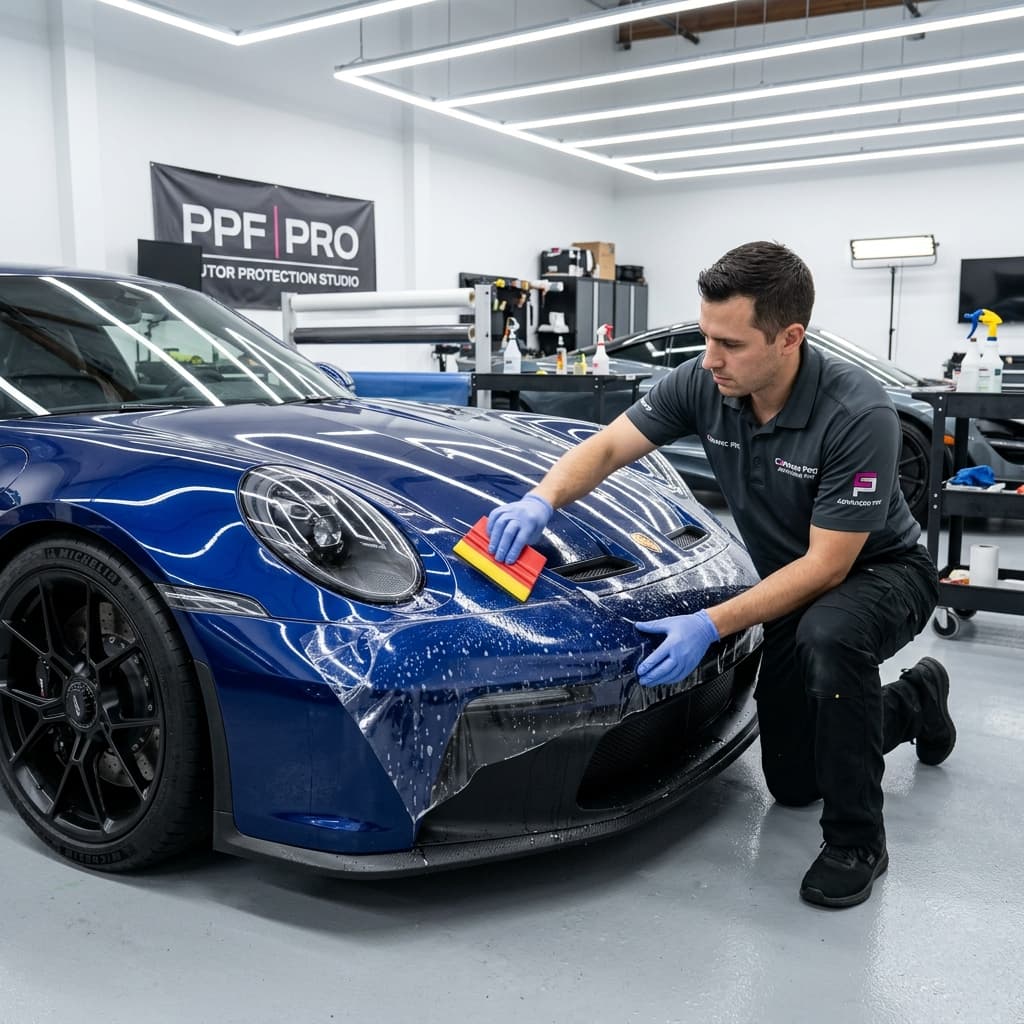
4–10 hours depending on coverageWith a clean, prepped surface, we move to cutting. Our shop uses XPEL's DAP (Design Access Program) — a database of computer-generated cutting patterns for over 100,000 vehicle makes, models, and years. Your vehicle's exact patterns are plotted and cut from film rolls using a precision plotter, ensuring accurate fitment without hand-cutting near painted surfaces. Cut panels are taken to the installation bay where the wet application process begins: film is misted with a slip solution, positioned precisely, then squeegeed from centre to edges to eliminate moisture and air. On complex curves — hood contours, fender radii, bumper wraps — the film is stretched, heated, and conformed to maintain uniform adhesion without distortion. Edge work is done throughout: film is wrapped around and under hood edges, bumper lips, fender flares, and mirror caps for complete coverage rather than a flush-cut edge that exposes raw film to wind and car washes.
Day 2–3 — Curing & Final Inspection
2–4 hoursAfter application, the vehicle rests in the bay while the adhesive begins its initial cure. We then perform a detailed inspection under intense lighting, examining every panel for air bubbles, edge adhesion, film tension on curves, and optical clarity. Any areas that don't meet our standard are addressed now — before delivery, not after a complaint. Edge sections are touched up as needed, and heat guns are used to ensure film is fully conformed to all curves and body lines. Before you pick up your vehicle, we walk through the installation with you — pointing out what was done, flagging any pre-existing paint issues we noted during decon, and walking through post-installation care instructions.
Post-Installation Care: The First 30 Days
The most critical period for PPF longevity is the first month after installation. The adhesive continues curing during this window, and certain activities can interrupt that process. Follow these guidelines carefully — they're not just recommendations, violations can affect warranty coverage. If you notice anything unusual during this period, our PPF troubleshooting guide walks through every common post-install concern so you can tell normal curing from a real issue.
No washing at all
This is the most critical window. The adhesive is in its most active curing phase. Even gentle hand washing with a hose can introduce water under partially bonded edges and slow the cure. If the car gets dusty, leave it. If it rains lightly, that's fine — just don't drive through a carwash or actively wash it.
Hand wash only — no pressure washers on edges
Gentle hand washing with a pH-neutral car shampoo and a clean microfibre wash mitt is safe after 48 hours. Do not direct a pressure washer at film edges — the force can peel partially cured edge sections. A regular garden hose rinsing from above is fine. No automatic car washes, no touchless if possible (the chemistry in some touchless systems is harsh on new adhesive).
No wax, sealant, or ceramic coating on PPF
If you're adding a ceramic coating over your PPF (a popular combo), wait until the film is fully cured — typically 7–30 days depending on conditions. Applying ceramic too early can interfere with the topcoat curing and cause haze. We can schedule your ceramic coating appointment as a follow-up if you want both services — we know exactly when the PPF is ready.
Back to normal — with good habits
After 30 days, the film is fully cured. Hand washing, pressure washing (keep wand at least 30 cm from film edges), touchless car washes, and most detailing products are safe. Avoid abrasive polishing compounds directly on the film — they can dull the self-healing topcoat. Stick to pH-neutral car shampoos and PPF-safe detailers for routine washing.
What We Inspect at Delivery
Before your vehicle leaves our shop, we inspect every installed panel under high-intensity lighting. We're looking for:
We also walk you through the vehicle at delivery and point out anything notable — any pre-existing paint issues we documented at intake, any panel that took extra time due to complex geometry, and any areas where we want you to pay attention during the curing phase. This is your chance to ask questions before you drive away. If you're still deciding on paint correction before booking, our guide on whether paint correction is needed first gives you a clear framework for making that call.
After delivery, our job doesn't stop. If you notice anything concerning in the first 30 days — a bubble that isn't resolving, an edge that looks like it might be lifting, a spot you want us to look at — contact us with a photo. We'd rather look at something that turns out to be normal curing than have you drive around for three weeks worrying about it.
Related Reading
How to Prepare Your Car for PPF Installation
What to do (and avoid) in the 48 hours before your appointment.
Paint Correction Before PPF: Do You Need It?
How to assess your paint condition and decide before booking.
PPF Troubleshooting: Bubbles, Yellowing & Peeling
A diagnostic guide for the most common post-install concerns.
Ready to Protect Your Vehicle?
XPEL Ultimate Plus and 3M Pro Series. Computer-cut patterns. Climate-controlled installation bay. Lifetime warranty. Get an exact quote and estimated timeline for your vehicle in 60 seconds.
Get a Free PPF QuoteFrequently Asked Questions
Experience The Best.
Don't let another commute compromise your vehicle. Get a quote from Calgary's Consumer Choice Award winner today.
Explore Our Services


")